Ignite Your Creativity: Top Microcontroller Project Ideas for All Levels
Microcontrollers are the unsung heroes of modern technology, powering everything from your microwave to sophisticated industrial equipment. They offer a fascinating playground for makers and engineers alike. This article will guide you through a range of exciting microcontroller projects suitable for all skill levels, helping you build practical gadgets and deepen your understanding of embedded systems. Whether you're a seasoned engineer or just starting out, these projects are sure to ignite your creativity and expand your knowledge of the world of electronics.
Getting Started: The 'Blinky' Project and Beyond
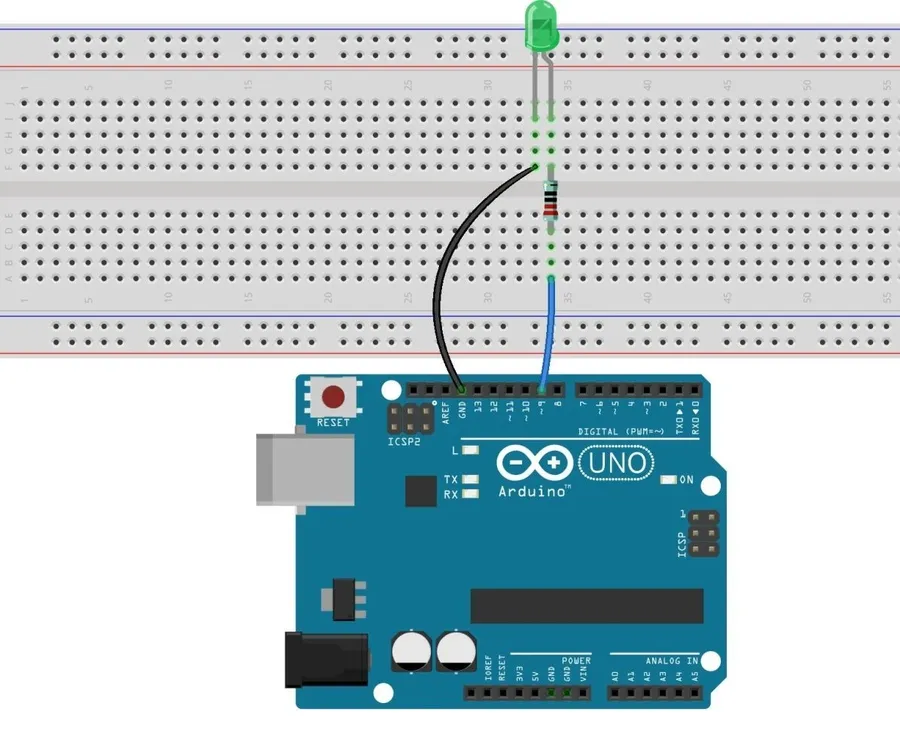
The 'Blinky' project, akin to the 'Hello World' of microcontroller programming, serves as the foundational step in learning to control microcontrollers. This initial project introduces the fundamental concepts of output control by manipulating an LED, alongside the basics of microcontroller programming and elementary timing circuits. Mastering this is essential for progressing to more intricate projects and interactive systems.
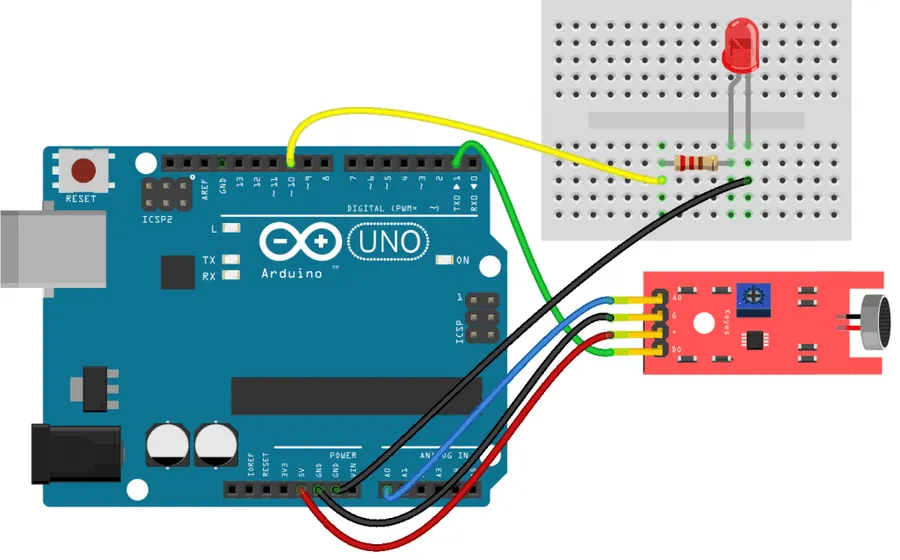
- Components Needed
A microcontroller board (e.g., Arduino Uno, ESP32), an LED, a resistor (typically 220-330 ohms), and connecting wires. Ensure all components are rated to operate within the safe operating parameters of the microcontroller. - Basic Microcontroller Programming
Begin with the microcontroller's Integrated Development Environment (IDE). Write code to set a digital pin as an output and control the LED by toggling the output between HIGH (on) and LOW (off). Note that 'high' and 'low' are logical levels representing voltage levels on the microcontroller pin, and these will vary depending on the specific voltage level of the microcontroller, e.g., 3.3V or 5V. This introduces fundamental programming concepts such as variable declarations, digital IO operations, and timing functions. - Understanding Timing Circuits
Use delay functions to control the blink rate of the LED. Experiment with different delay values to observe the effects on blink frequency. Microcontroller timers are based on an internal clock that is usually driven by a crystal. Ensure that you refer to the timing specifications of the particular microcontroller you are using. - Expanding Beyond the Basics
Explore how to control multiple LEDs, create different blinking patterns, and introduce the use of buttons for user interaction. This progression introduces you to more advanced programming concepts, such as branching using if statements and looping using for or while statements. This further helps understand the structure of a basic micro controller program loop and how events can be generated and reacted to.
Interactive Projects: Sensors, Displays, and User Input
This section delves into the creation of interactive microcontroller projects by integrating sensors, displays, and user input mechanisms. Such projects move beyond simple output and allow for real-time data acquisition, visualization, and user interaction, which are essential for a wide array of applications, from environmental monitoring to interactive gaming.
Key components of interactive projects include:
- Sensors
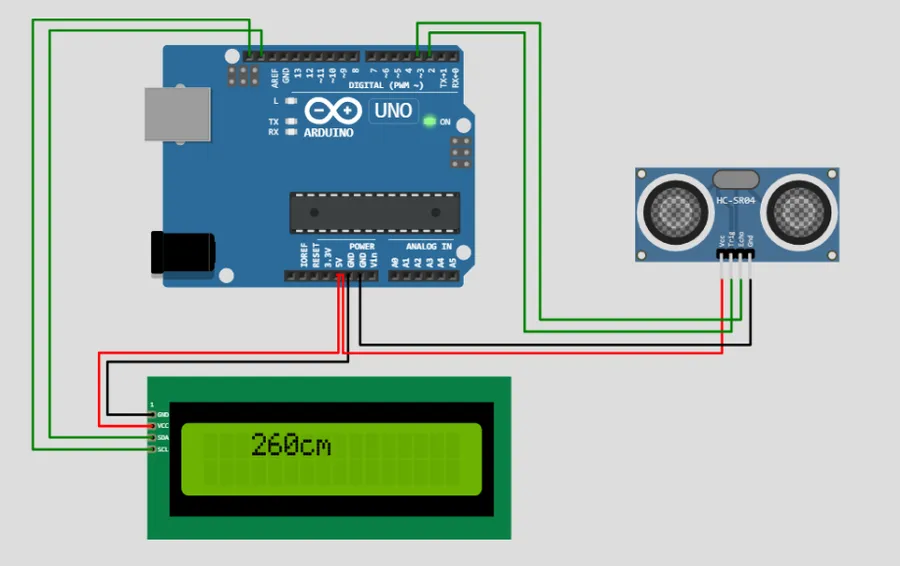
Devices that detect changes in the physical environment (e.g., temperature, light, distance). Common examples include: LM35 temperature sensor, LDR light sensor, HC-SR04 ultrasonic sensor. These sensors transform physical quantities into electrical signals that can be processed by the microcontroller. - Displays
Devices that output information for human interpretation. Common types include: LCDs (Liquid Crystal Displays) such as 16x2 or 20x4 character LCDs, and OLED (Organic Light Emitting Diode) displays. These components display data, messages, or graphical information generated by the microcontroller. - User Input Devices
Components that enable users to interact with the microcontroller project. Common examples are: pushbuttons, potentiometers (variable resistors), and keypads. These inputs allow users to control the system’s behavior.
Examples of interactive projects:
- Basic Weather Station
Utilizing temperature and humidity sensors (e.g., DHT11, DHT22) and an LCD display, this project shows real-time environmental data. - Interactive Game
Using a button or keypad as input and an LED or LCD as an output, simple games such as 'Simon Says' or a number guessing game can be implemented. This demonstrates the real-time interaction between user input and system response. - Distance Measurement Tool
Integrating an ultrasonic sensor with an OLED display provides real-time distance measurements, with applications in ranging and object detection.
| Component | Function | Example Application |
|---|---|---|
| LM35 Temperature Sensor | Measures ambient temperature | Weather station, temperature monitoring systems |
| LDR Light Sensor | Measures light intensity | Automatic lighting systems, light level meters |
| HC-SR04 Ultrasonic Sensor | Measures distance | Obstacle detection, ranging devices |
| 16x2 LCD | Displays text-based output | System status, sensor readings |
| Pushbutton | Provides digital input | User control, game interaction |
| Potentiometer | Provides variable analog input | Control signal adjustment, user-controlled settings |
Communication Protocols: Wireless Control and Data Transfer
Microcontroller projects often require communication with other devices or systems. This section explores essential communication protocols like I2C, SPI, and UART, and delves into the realm of wireless technologies such as Bluetooth and WiFi using modules like ESP8266 and ESP32. These protocols enable more complex interactions and data exchange, facilitating projects ranging from remote controls to sophisticated sensor networks.
| Protocol | Description | Typical Use Cases | Advantages | Disadvantages |
|---|---|---|---|---|
| I2C | A two-wire serial communication protocol for short-distance communication. | Connecting multiple sensors, EEPROMs, and other peripherals to a microcontroller. | Simplicity, low pin count, supports multiple devices on same bus. | Slower speed compared to SPI, limited to short distances. |
| SPI | A synchronous serial communication protocol using clock, data, and selection lines. | Connecting high-speed peripherals like SD cards, displays, and ADCs. | Faster data transfer speeds than I2C. | More pins required than I2C, more complex hardware configuration. |
| UART | An asynchronous serial communication protocol for transmitting data between two devices. | Communicating with computers, GPS modules, and other serial devices. | Simplicity, widely supported, only uses two pins for data transfer. | Slower than SPI, requires data framing, usually one device to one device. |
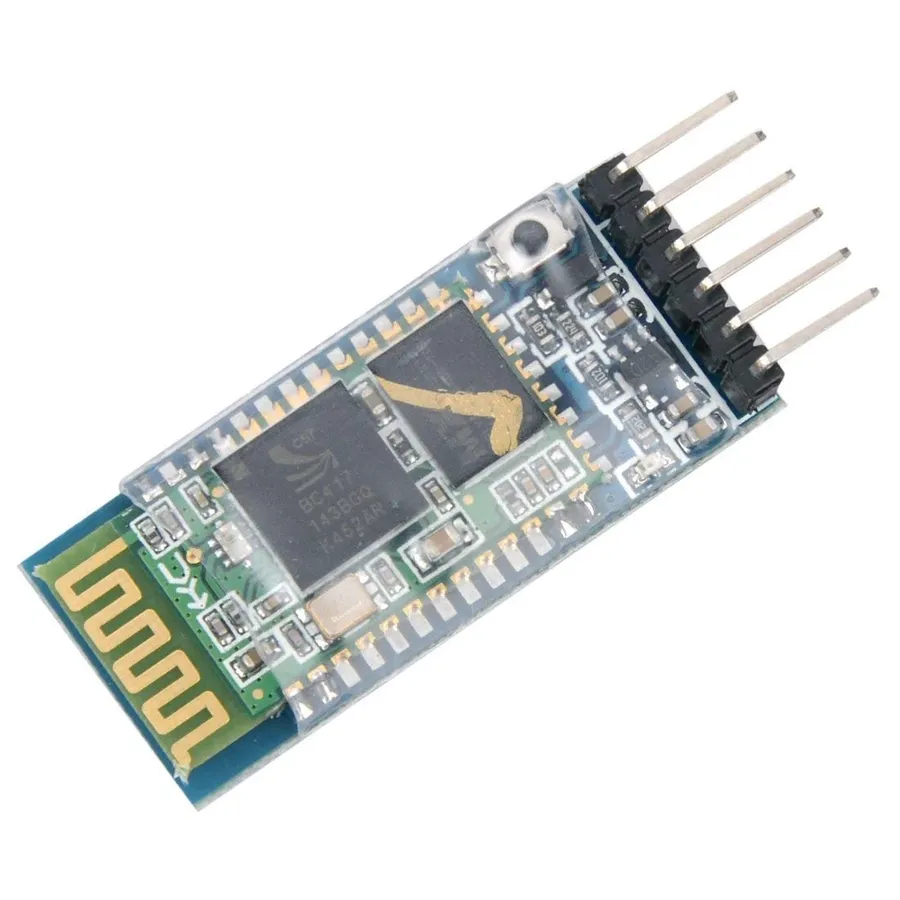
| Bluetooth | Short range wireless technology for exchanging data. | Creating wireless remotes, connecting to mobile devices, transferring sensor data. | Low power consumption, ease of use with smart devices. | Limited range, data rate is slower than WiFi. |
| WiFi (ESP8266/ESP32) | Wireless networking technology for connecting to the internet. | Connecting to cloud services, creating IoT devices, and remote monitoring systems. | Longer range than Bluetooth, high data rates. | Higher power consumption than Bluetooth, more complex setup. |
- Remote Control Projects:
Utilize Bluetooth or WiFi modules to build remote controls for robots, home appliances, or other devices. You can transmit control commands from a smartphone or another microcontroller. For example, design a universal remote for your television or build a wireless robot control. - Sensor Networks:
Deploy multiple sensors across an area and transmit their readings to a central server. Use I2C or SPI to connect sensors to microcontrollers and WiFi to send data wirelessly. Applications include environmental monitoring (temperature, humidity, air quality) or agricultural data collection. This allows for a distributed sensing approach. - Home Automation Systems:
Integrate microcontrollers with WiFi to build smart home devices. Control lights, fans, or other appliances remotely using a smartphone or web interface. Consider a system that can monitor your security and allows remote access. The ESP modules provide a simple way to interface with web technologies. - Data Logging and Transfer:
Collect data from sensors and transmit it wirelessly to a database or cloud platform for storage and analysis. Use UART for direct connection or WiFi for remote data transfer. Applications for this includes industrial monitoring or healthcare systems, where real-time data analysis is important.
Advanced Projects: Motor Control and Robotics
Delving into motor control and robotics with microcontrollers represents a significant step towards more complex and rewarding projects. This domain involves understanding the nuances of different motor types—DC, servo, and stepper—and implementing the necessary control algorithms to manipulate their movements accurately. The combination of programming and physical construction in these projects leads to an enhanced grasp of real-world engineering challenges.
Driving motors with microcontrollers requires an understanding of electronic interfacing, including techniques such as pulse width modulation (PWM) for speed control, and H-bridges for directional changes. For robotics, integrating these motor controls with sensors and control algorithms allows for complex functionalities, such as autonomous navigation and manipulation. Below are some details on these aspects:
| Motor Type | Control Method | Typical Application | Advantages | Disadvantages |
|---|---|---|---|---|
| DC Motor | PWM for speed; H-Bridge for direction | Simple robots, fans, conveyors | Simple control, relatively inexpensive | Requires feedback control for precise movements |
| Servo Motor | Pulse Width Modulation (PWM) | Robotic arms, camera gimbals, steering | Precise angular control, built-in feedback | Limited rotation range (typically 180 or 360 degrees) |
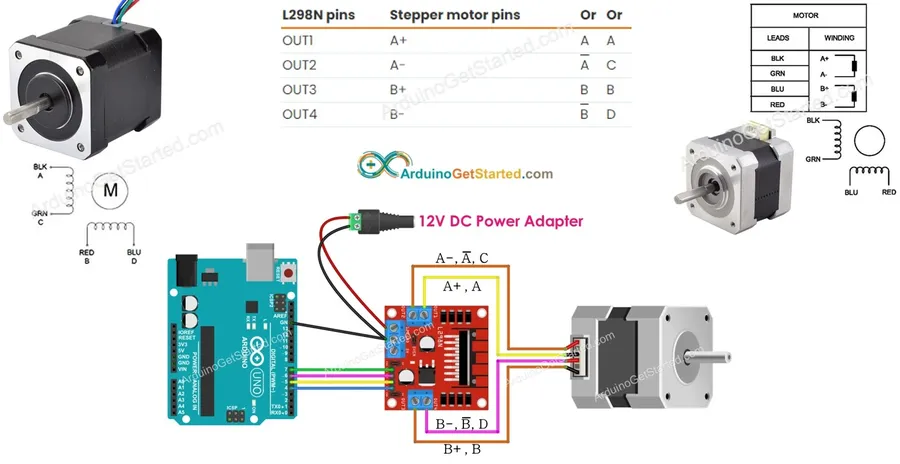
| Stepper Motor | Step-by-step control via pulse trains | 3D printers, CNC machines, precise positioning systems | High precision, open loop control is feasible | Can be complex to drive, lower speed and torque |
Starting with simple line-following robots provides an initial entry point into robotics, while projects such as robotic arms introduce more sophisticated elements of kinematics and control. Successful completion in this domain often requires a strong foundation in both embedded systems and mechanical design principles. The following aspects can be considered for these projects:
- Line Following Robots
Use reflective sensors to detect a line and PID control to make the robot follow the line. Start simple and gradually add complexity. - Robotic Arm Control
Implement inverse kinematics to map desired end-effector positions to motor angles, requiring careful calibration and control logic. - Obstacle Avoidance Robots
Utilize ultrasonic or infrared sensors, along with algorithms, to enable a robot to navigate around obstacles in its environment.
These projects are more demanding than the initial projects, and they lead to deeper understanding of electromechanical systems and robotics, which are invaluable for engineering and research.
Internet of Things (IoT) Applications
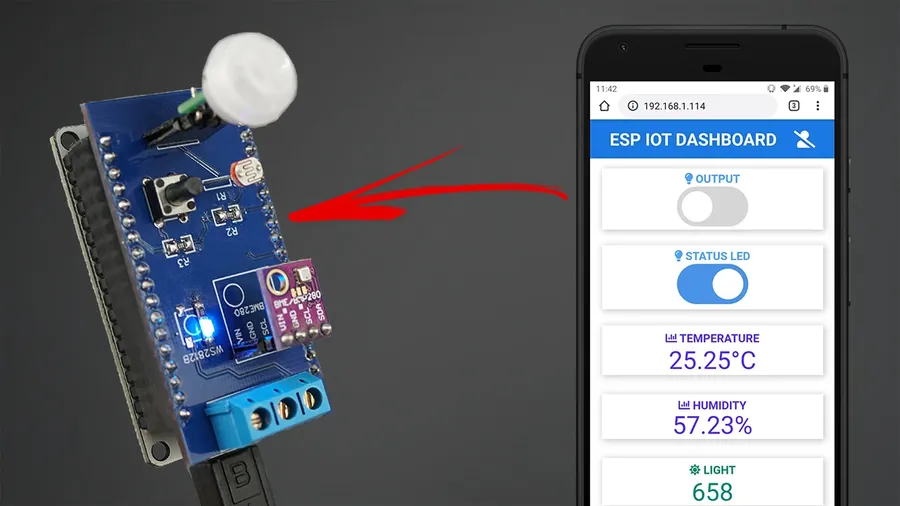
Microcontrollers are pivotal in enabling Internet of Things (IoT) applications, bridging the gap between the physical world and the digital realm. By connecting sensors to the internet, these devices empower remote data collection, device control, and automation, thereby creating a network of intelligent and interconnected systems. This chapter explores how to harness microcontroller capabilities to build practical IoT devices.
- Home Automation System
Utilize microcontrollers to monitor and control home appliances, lighting, and security systems. Sensors can track temperature, humidity, and motion, transmitting this data to a central system that can be remotely controlled through a web interface or mobile application. - Environmental Monitoring
Develop systems that monitor air quality, water levels, and other environmental parameters using specialized sensors. Data is then transmitted to a server or cloud service, enabling real-time tracking and historical analysis of environmental conditions, aiding in conservation efforts and public health initiatives. - Smart Agriculture
Implement IoT devices for precision agriculture. These devices can monitor soil moisture, temperature, and light levels, sending this data to farmers, who can make informed decisions about irrigation, fertilization, and other aspects of crop management to maximize yield and resource efficiency. - Remote Asset Tracking
Design systems that track the location and condition of assets (e.g., vehicles, equipment, packages). Using GPS and other sensors, these devices provide real-time updates, facilitating logistics management and inventory tracking for businesses of all sizes. - Personal Health Monitoring
Build wearable devices that monitor vital signs like heart rate, activity levels, and sleep patterns. This data can be used to track personal health and fitness, empowering individuals to make informed decisions about their well-being.
| IoT Application | Microcontroller Role | Sensors Used | Connectivity | Key Benefits |
|---|---|---|---|---|
| Home Automation | Control of devices, data processing | Temperature, light, motion | WiFi, Bluetooth | Convenience, energy efficiency |
| Environmental Monitoring | Data collection and transmission | Air quality, water level | WiFi, cellular | Real-time tracking, public health |
| Smart Agriculture | Precision monitoring of conditions | Soil moisture, temperature | WiFi, LoRa | Optimized resources, increased yield |
| Remote Asset Tracking | Location and condition monitoring | GPS, accelerometer | Cellular, WiFi | Logistics and inventory management |
| Personal Health Monitoring | Data collection and transmission | Heart rate, activity | Bluetooth | Personal health tracking |
The development of these IoT applications is facilitated by the availability of numerous software libraries and online services. These resources provide high-level functions for communication protocols, cloud integration, and data visualization. Popular platforms such as Arduino, Raspberry Pi, and ESP32/ESP8266 have extensive community support and development tools, which greatly simplify the design and deployment of IoT systems. By combining these technologies with readily available sensors, individuals and companies can create customized solutions for diverse needs.
Audio and Signal Processing Projects
Microcontrollers are not just for controlling LEDs and motors; they can also be powerful tools for audio and signal processing. Exploring these capabilities opens a world of exciting projects, offering a practical bridge between the digital world of microcontrollers and the analog realm of sound and signals. These projects delve into the intricacies of capturing, manipulating, and outputting analog signals, providing a valuable understanding of signal analysis and processing techniques that are fundamental to various industry and academic research endeavors.
Engaging in audio and signal processing projects provides an in-depth understanding of how analog signals can be manipulated in the digital domain, laying a solid foundation for advanced applications such as digital filters, audio synthesis, and data acquisition.
- Basic Sound Generator
Create a simple tone generator using a microcontroller, DAC (Digital-to-Analog Converter), and a speaker. This project explores fundamental audio output principles, enabling the generation of basic waveforms like sine, square, and sawtooth waves. By manipulating the frequency and amplitude of the generated signals, you can create various tones and sound effects. - Audio Amplifier
Develop an audio amplifier circuit using a microcontroller, operational amplifier (op-amp), and passive components. This project focuses on amplifying weak audio signals to a level suitable for driving a speaker. Understanding impedance matching and gain control is crucial for achieving clear and undistorted audio output, and will be a key takeaway from this project. - Signal Processing Project
Build a project that involves basic signal processing, such as a simple filter or an envelope follower using ADC(Analog-to-Digital Converter) or DAC. These are fundamental building blocks of many signal processing systems used in industry and research. You can design and implement a low-pass, high-pass, or band-pass filter to manipulate the frequency content of an audio signal. Explore how different filter characteristics can change the sonic properties of a signal. - Audio Effects Processor
Create a basic effects processor by implementing algorithms to introduce distortion, echo, or reverb using the microcontroller. This project focuses on manipulating the digital audio signals using algorithms and techniques commonly used to create the aforementioned effects.
Practical Applications of Microcontroller Projects in Everyday Life

Microcontroller projects transition from theoretical exercises to practical solutions, addressing real-world problems and improving daily routines. These projects empower users to create personalized, efficient, and innovative devices for everyday use.
- Smart Home Automation
Microcontrollers can automate lighting, temperature control, and security systems, enhancing convenience and energy efficiency. For example, a system could automatically adjust room temperature based on occupancy and time of day, or activate lights only when motion is detected. These systems often incorporate sensors for detecting environmental changes and actuators for making the needed adjustments. - Personal Health Monitoring
Wearable devices based on microcontrollers monitor heart rate, activity levels, and sleep patterns, providing valuable health data. These devices typically employ sensors to capture physiological data and wireless communication protocols to send the data to mobile phones or other devices for analysis. The data can then be used to track progress or to adjust personal health routines. - Automated Tools and Gadgets
Microcontrollers can power automated tools such as robotic vacuum cleaners, smart irrigation systems, or customized kitchen appliances, improving productivity and convenience. These tools often use a variety of motors and sensors and require complex programming. The combination of sensors, actuators, and processing power provides tools that are more effective and often less expensive. - Environmental Monitoring Systems
Microcontrollers can be used to create systems that monitor air quality, water levels, or soil conditions, enabling better environmental management. This can be done in a variety of ways, from simple sensors connected to a processing unit, to entire network systems that can send data remotely for analysis. The goal is to provide timely, accurate information for better resource management. - Assistive Technologies
Microcontroller projects can create assistive devices for individuals with disabilities, such as automated medication dispensers or communication aids, enhancing independence and quality of life. Examples include custom solutions to aid in daily tasks, to aid those with mobility issues, or for those with cognitive impairments. These systems can provide personalized solutions tailored to individual needs.
Frequently Asked Questions About Microcontroller Projects
This section addresses common questions about microcontroller projects, including how to select the right microcontroller, manage project requirements, and troubleshoot issues. We aim to provide practical answers to help you navigate the exciting world of microcontroller development.
- How do I choose the right microcontroller for my project?
Selecting the right microcontroller depends heavily on your project's needs. Consider factors such as processing power, memory requirements, the number of input/output (I/O) pins needed, and power consumption. Start by defining your project's core functionalities and comparing microcontroller specifications against these. For instance, a simple LED blinking project can use a very basic microcontroller, but a complex IoT project might require more advanced chips with integrated wireless capabilities. Check datasheets, compare clock speeds, flash memory, RAM and available peripherals for a fit. - What are the essential tools and software for starting microcontroller projects?
You'll generally need a development board featuring your selected microcontroller, a computer for coding, a compiler or integrated development environment (IDE), a power supply for your board and some way to program it, and a few essential electronic components like resistors, capacitors, LEDs, and wires. Often, a breadboard can be useful for prototyping before you design custom PCBs. Common IDEs include the Arduino IDE, PlatformIO, and the vendor-specific development environments. Consult online tutorials and forums for your selected microcontroller to find any other tools you might need. - What are common problems when working with microcontrollers, and how can I troubleshoot them?
Common issues include incorrect wiring, power supply problems, code errors, and communication issues between the microcontroller and other devices. Troubleshooting steps typically involve carefully checking all wiring, confirming your power supply meets spec requirements, using a multimeter to test voltages and component connectivity, reviewing your code for syntax and logic errors, and using debugging tools provided by your IDE. For communication issues, make sure that all protocols are set up correctly with correct speeds and device addresses. Start small, testing simple components individually before integrating more complex circuits. - How can I protect my microcontroller from damage?
Protecting your microcontroller involves several key practices: Always respect voltage and current limits specified in the microcontroller’s datasheet and use suitable power supplies. Use current-limiting resistors in series with LEDs and other high current components. Include surge protection using TVS diodes or similar at power inputs. Use pull-up or pull-down resistors on digital inputs to prevent floating states, which can damage the pins. Also, pay attention to ESD (electrostatic discharge) precautions by using anti-static wrist straps and mats when handling components. Finally always double check your wiring before turning on the power. - Where can I find reliable resources for learning more about microcontrollers?
Reliable resources include the official websites and documentation of the microcontroller manufacturers, which contain datasheets, application notes, and technical manuals, plus online forums like Stack Exchange, vendor support forums, and dedicated communities for microcontroller enthusiasts. Many universities offer courses online, and reputable hardware retailers offer their own tutorials, wikis and project guides. Look for reputable authors and check reviews to ensure the resource is accurate and comprehensive, and use multiple resources for any project, as each can provide a unique perspective. - What are good starting projects for beginners in microcontroller programming?
Beginners should start with simple projects such as the 'Blinky' LED example or projects that involve reading button presses, working with basic sensor inputs like temperature or light sensors, displaying outputs on an LCD or simple LED matrix display. These kinds of projects help you understand the fundamental I/O concepts, logic and programming in a simple to implement system. These projects also build confidence and give you the building blocks to work with more complex projects. - How do I optimize my microcontroller code for efficiency?
Optimizing microcontroller code is critical for performance and power saving. Minimize the use of computationally expensive operations like division and floating-point arithmetic. Implement efficient data structures and algorithms, use lookup tables for common calculations and avoid delays that can be done with hardware peripherals like timers. Use sleep modes to reduce power consumption during idle periods, and compile your code with optimization flags enabled for your chosen compiler. Profile your code if necessary to identify bottlenecks. Always use low-power operation in embedded systems.
Microcontroller projects offer an excellent platform to learn embedded systems, electronics and improve your problem solving skills. With endless possibilities, you can start with the basics and slowly build your skills to more complex systems. The projects listed here provide a stepping stone to real world applications. Your journey in the world of microcontrollers begins now; unleash your creativity and build something amazing!