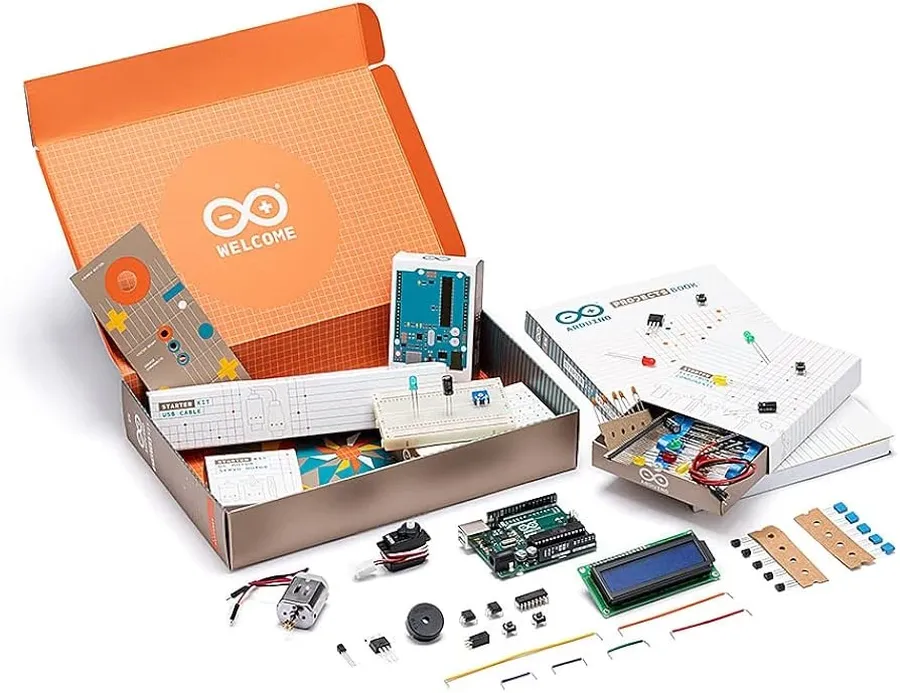
Unboxing the Arduino Starter Kit: Your Launchpad into Electronics
Have you ever wondered how everyday tech works? The magic often starts with a microcontroller, and Arduino starter kits are your gateway to understanding this world. From blinking LEDs to complex sensor networks, an Arduino kit provides the foundation for countless projects. This article will explore the components of Arduino starter kits, guide you in selecting the right one, and provide inspiration for your first hands-on project. Let's demystify this incredible tool, connecting technology to our lives, one circuit at a time, and get you started with your own arduino starter kits.
What's Typically Inside an Arduino Starter Kit?
An Arduino starter kit serves as an entry point to the world of electronics and programming, typically providing a curated collection of components designed to facilitate hands-on learning. At the core of these kits is the Arduino Uno board, which acts as the microcontroller. Supplementing this are essential elements such as a breadboard, jumper wires, resistors, various LEDs, and sensors, each chosen to enable a diverse range of introductory projects.
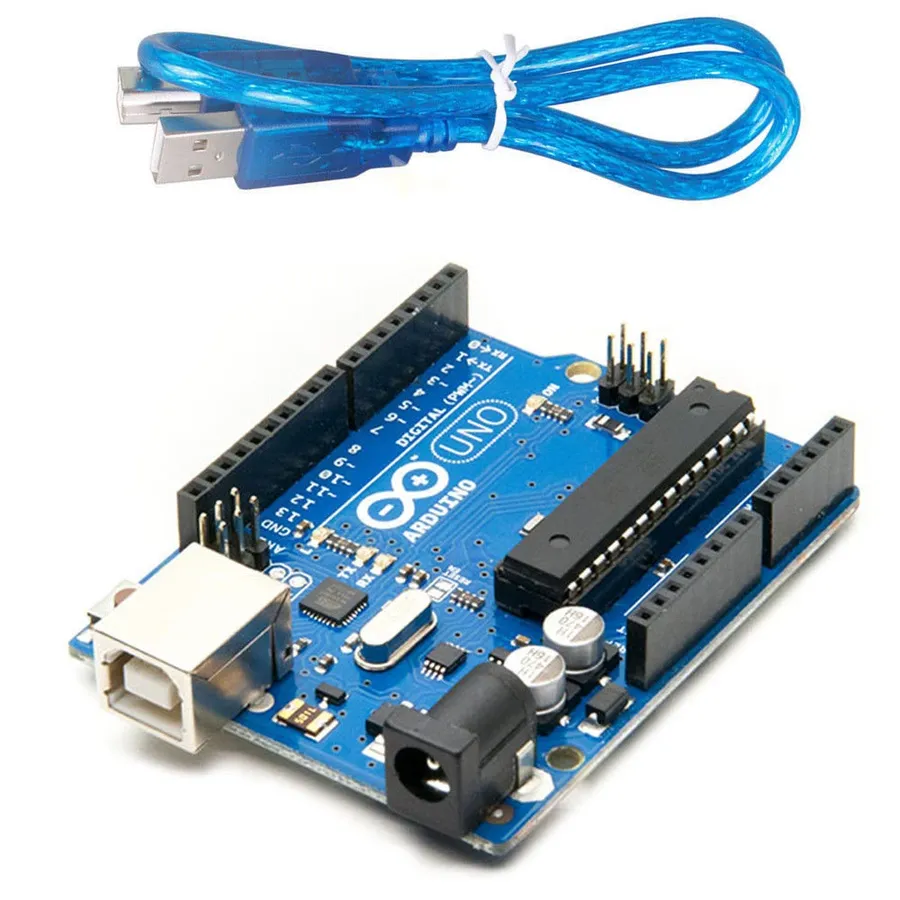
- Arduino Uno Board
The central processing unit of the kit, it's a microcontroller board based on the ATmega328P. It executes code uploaded from a computer and interacts with other components. - Breadboard
A solderless prototyping board used to build electronic circuits. Components are connected using jumper wires, enabling easy experimentation and modification. - Jumper Wires
Used for making connections between the Arduino Uno board, breadboard, and other components. They come in male-to-male, male-to-female, and female-to-female configurations. - Resistors
Passive components that limit the flow of electric current. They are essential for protecting other components like LEDs from overcurrent. - LEDs (Light Emitting Diodes)
Semiconductor light sources that emit light when an electric current passes through them. Commonly used to indicate the state of a digital output or in simple light-based projects. - Various Sensors
These can include temperature, light, motion, and other types of sensors that allow the Arduino to interact with the environment and respond to physical changes.
These components are carefully selected to introduce fundamental electronic concepts and enable beginners to quickly prototype interactive projects. The Arduino Uno board, in combination with a breadboard, facilitates the construction of circuits without the need for soldering, making it an ideal platform for learning and experimentation.
Choosing the Right Arduino Starter Kit for Your Needs

Selecting the ideal Arduino starter kit is crucial for a successful and enjoyable learning experience. The right kit aligns with your experience level, project aspirations, and budgetary considerations. Starter kits vary significantly, ranging from basic sets suitable for absolute beginners to more comprehensive options designed for enthusiasts with prior experience. Therefore, careful evaluation of these factors is necessary to ensure that the chosen kit meets your specific needs and enhances your exploration of electronics and programming with Arduino.
The market offers a spectrum of Arduino starter kits, broadly categorized into official kits from Arduino and third-party alternatives. Official kits often provide a curated selection of components and well-structured learning materials, ensuring compatibility and a smooth learning curve. Third-party kits, on the other hand, can offer a broader range of components or a more affordable entry point. However, these might not have the same level of documentation or support as their official counterparts.
- Beginner Kits
These typically include the Arduino Uno board, a breadboard, a selection of LEDs, resistors, jumper wires, and basic sensors. They are ideal for those completely new to electronics and programming. - Intermediate Kits
These build upon the beginner kits by adding more complex sensors (e.g., temperature, humidity, distance), motors, and more advanced components. This helps in experimenting with a broader range of interactive projects. - Advanced Kits
These are for experienced users and include components for more sophisticated projects, such as LCD screens, wireless communication modules, and precise sensing devices. These kits enable intricate projects and deeper exploration of Arduino’s possibilities.
| Criteria | Beginner Kits | Intermediate Kits | Advanced Kits |
|---|---|---|---|
| Target User | Absolute beginners | Users with some experience | Experienced users |
| Components | Basic components (LEDs, resistors, simple sensors) | More complex sensors and motors | LCD screens, wireless modules, precision sensors |
| Project Complexity | Simple circuits and basic programming | Interactive projects and sensor integration | Sophisticated and intricate projects |
| Learning Curve | Easy to understand | Moderate learning curve | Steep learning curve |
| Price | Lower price range | Mid-range price | Higher price range |
Arduino Uno vs. Other Boards in Starter Kits
While the Arduino Uno is the most common microcontroller board found in starter kits, it's important to understand how it compares to other boards, such as the Nano and Mega, which may be included in some kits or considered for future projects. Each board has unique characteristics that make it suitable for different applications, and understanding these differences is crucial for beginners to select the most appropriate board for their projects.
| Feature | Arduino Uno | Arduino Nano | Arduino Mega |
|---|---|---|---|
| Microcontroller | ATmega328P | ATmega328P | ATmega2560 |
| Clock Speed | 16 MHz | 16 MHz | 16 MHz |
| Digital I/O Pins | 14 (6 can be PWM) | 14 (6 can be PWM) | 54 (15 can be PWM) |
| Analog Input Pins | 6 | 8 | 16 |
| Flash Memory | 32 KB | 32 KB | 256 KB |
| SRAM | 2 KB | 2 KB | 8 KB |
| Form Factor | Standard size, DIP package | Small size, breadboard-friendly | Large size, DIP package |
| Ease of Use for Beginners | Very high | High | Medium |
| Cost | Moderate | Low | High |
| Ideal For | General projects, learning | Small, space-constrained projects | Complex projects requiring more I/O and memory |
| Advantages | Good balance of features, widely supported, numerous tutorials available. | Compact, breadboard-friendly, lower cost for the same core function as the Uno. | Large number of I/O pins, substantial memory and more processing power for complex projects |
| Disadvantages | Larger footprint can be less convenient for some projects. | Requires a USB adapter for programming. | Larger footprint, higher cost, more complex for beginners |
The Arduino Uno provides a robust and versatile starting point for most beginner projects due to its balanced capabilities and extensive community support. The Nano is a good alternative when space is a constraint, although it may be slightly less accessible due to its smaller form factor. The Mega board is typically not used by beginners unless a specific application requires its significantly greater I/O, memory and processing power.
Essential First Projects with an Arduino Starter Kit
Embarking on your Arduino journey begins with practical, hands-on projects designed to introduce fundamental concepts. These initial projects are curated to provide a beginner with quick, tangible results, allowing for a rapid understanding of how the components of the Arduino starter kit interact and function.
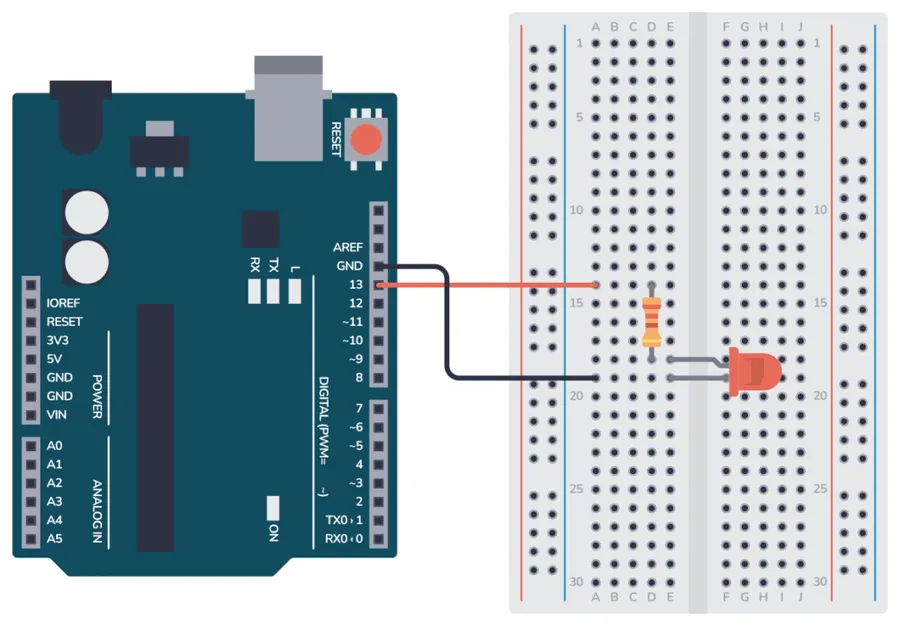
- Blinking an LED
The 'Hello, World' of electronics, this project involves wiring an LED to your Arduino and programming it to blink. This introduces basic output control and digital pin usage. The core idea is to use the delay function and digital write to turn on and off the LED. - Controlling LED Brightness with a Potentiometer
Building upon the blinking LED project, this one introduces analog input. By connecting a potentiometer, you can adjust the voltage going into an analog pin, which in turn controls the brightness of an LED. This showcases the interplay between analog input and PWM output. - Reading Sensor Data
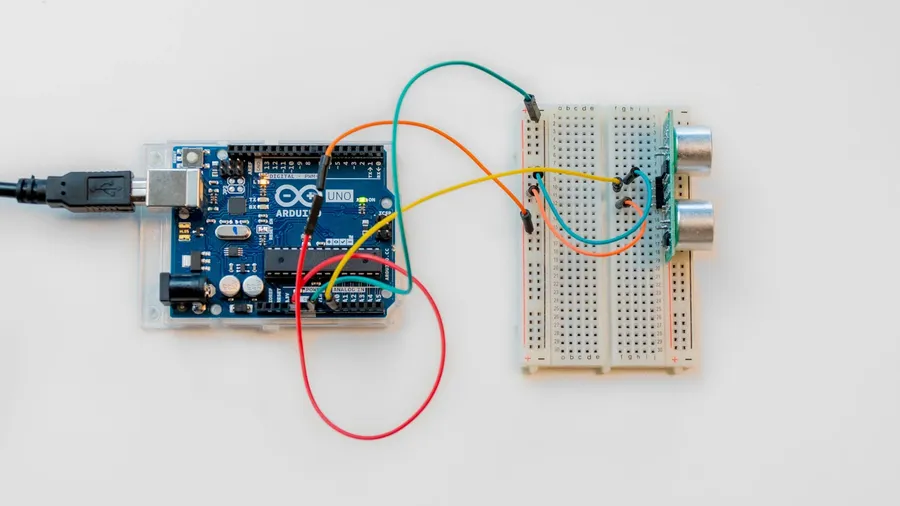
This project involves using a sensor, such as a temperature or light sensor, to gather data. The Arduino reads the analog sensor data and displays it on your computer. This project demonstrates how the Arduino interfaces with real-world inputs through sensors.
These projects serve as a foundation, illustrating core electronic principles and programming concepts that form the basis for more complex applications. They're designed to build a user's confidence, making the learning process enjoyable and rewarding.
Expanding Your Arduino Projects Beyond the Kit
An Arduino starter kit provides a solid foundation for learning electronics and programming, but the possibilities expand exponentially once you start incorporating additional components and exploring new project ideas. This section guides you on how to extend your initial setup, acquire new parts, and integrate them effectively into your existing projects, moving beyond the confines of the basic kit.
- Identifying Project Needs
Before acquiring new components, clearly define your project goals. This includes identifying any sensors or output devices that are needed for your new projects, such as specific sensor types, more advanced displays, or different types of actuators. Understanding the specific requirements helps to ensure that the additional components you buy are necessary and that they effectively meet the new project goals. - Sourcing New Components
There are many places to source new components for your Arduino projects. Online retailers like Adafruit, SparkFun, and Amazon offer a wide selection of parts. Consider local electronics stores as well for quicker access. When buying online, pay attention to the store's reputation and reviews. Check that components are compatible with your Arduino board, and that the specifications of the component meet the requirements of the new projects. - Integrating Additional Sensors
Expanding sensor capabilities greatly increases project functionality. Consider adding components such as temperature sensors (like the DHT11 or LM35), humidity sensors, pressure sensors (like the BMP180), or infrared proximity sensors. The integration often involves understanding the datasheet for the new sensor, connecting the sensor to the correct pins of the Arduino board, and modifying the code to read and interpret the data. Carefully check sensor pinouts and operating voltages to avoid damage. - Upgrading Output Devices
Improve user interfaces by adding LCDs or OLED screens for displaying data, or consider implementing more dynamic outputs using servo motors for precise motion or stepper motors for accurate positioning. When upgrading output devices, be mindful of the current requirements and ensure the Arduino power supply is adequate. Additional power supply circuits may be needed for high current devices like relays and motors. - Enhancing Communication
Explore options for wireless communication using modules such as Bluetooth (HC-05), Wi-Fi (ESP8266 or ESP32), or RF (nRF24L01) for remote control or data logging. Ensure compatibility with the Arduino board and understand basic networking concepts. These modules extend project scope to remote sensing, controlling devices over a network or the internet, and allowing communication between different microcontrollers. - Power Management
When expanding projects, carefully manage power requirements. Incorporate additional power supplies, consider using step-up or step-down converters, or utilize external batteries. Ensure that the chosen method provides stable and reliable power to all project components. Protect sensitive electronics by employing appropriate fuses or voltage regulators. - Advanced Project Ideas
With additional components, consider building advanced projects such as a weather station, a robotic arm, an automated gardening system, or an internet-connected sensor network. Each project will build skills in the areas of electronic circuits and programming, and also in the areas of project management, system design, and troubleshooting.
Troubleshooting Common Issues with Arduino Starter Kits
Navigating the world of Arduino can sometimes present challenges, especially for beginners. This section addresses common issues encountered with Arduino starter kits, providing practical solutions to keep your projects running smoothly. Identifying these typical pitfalls early can save valuable time and prevent unnecessary frustration.
- Wiring Errors
Incorrect wiring is a frequent cause of malfunctions. Double-check all connections against your circuit diagram. Ensure that wires are firmly inserted into the breadboard or Arduino pins. Pay close attention to polarity, especially with LEDs and polarized components. - Software Issues
Problems with code can manifest in various ways. Syntax errors will prevent compilation, while logic errors may lead to unexpected behavior. Always review your code for typos and make sure that pin assignments in the code match the physical circuit. Use the Arduino IDE's serial monitor to check the data being transmitted, which can help diagnose problems with the code. - Power Supply Problems
Insufficient or fluctuating power can cause erratic behavior. Ensure that the power source (usually USB or a 9V battery) provides adequate voltage and current to all your components. A multimeter can verify the voltage levels in different parts of the circuit. Avoid drawing too much current, which may damage the Arduino board or connected peripherals. - Component Malfunctions
While uncommon, individual components may be faulty. If a specific component is not working as expected, try using an equivalent component. Check the datasheet to ensure proper functionality of components such as sensors and LEDs. - Driver Issues
Your computer must recognize the Arduino board. Sometimes, incorrect drivers may prevent communication between your computer and the Arduino. Reinstall or update the drivers according to the Arduino IDE instructions, as issues with connectivity are very common.
Frequently Asked Questions about Arduino Starter Kits
Navigating the world of Arduino can be daunting for beginners. This section addresses common questions regarding Arduino starter kits, providing clarity and direction for those just starting their journey in electronics and programming.
- Which Arduino board is best for beginners in a starter kit?
The Arduino Uno is generally considered the best board for beginners due to its simplicity, extensive community support, and wide availability of learning resources. Most starter kits are built around the Uno for this reason. It provides a good balance of features and ease of use, making it ideal for learning the fundamentals of electronics and Arduino programming. - What is the primary purpose of an Arduino starter kit?
An Arduino starter kit is designed to introduce beginners to the world of embedded systems, electronics, and programming through hands-on projects. It provides all the necessary components and guidance to complete basic projects, allowing users to learn by doing and build a foundation for more complex projects later on. The kit also helps familiarize users with the Arduino IDE (Integrated Development Environment) and basic coding concepts. - Are Arduino starter kits suitable for complete beginners with no prior experience?
Yes, Arduino starter kits are specifically designed for beginners with no prior experience. The included components, project guides, and available resources are all geared towards facilitating a smooth learning experience. The projects typically start very simple and gradually introduce more complex ideas. The online community is also very supportive for newcomers. - What is the best product in the Arduino family for someone who is just starting?
For beginners, the Arduino Uno remains the best starting point. Its robust design, ample documentation, and extensive project library make it extremely user-friendly for beginners. While other Arduino boards are available, the Uno provides the simplest and most accessible introduction to the platform, allowing newcomers to focus on learning without being overwhelmed by advanced features. - Can I expand the functionality of my Arduino starter kit?
Yes, absolutely. The beauty of Arduino is its open-source nature and expandability. Once you have completed the projects included in your starter kit, you can easily purchase additional sensors, actuators, and other electronic components to expand the capabilities of your projects, making it extremely versatile. The community provides a wide range of information to help with this process. - How do I avoid damaging the components included in an Arduino Starter Kit?
To avoid damaging components in your Arduino starter kit, always double-check wiring before applying power, use resistors with LEDs and other components that require them, avoid exceeding voltage limits specified for the board, and always disconnect power when making circuit modifications. Careful handling and attention to best practices are crucial. Reading datasheets for individual components is also highly recommended for beginners. - Are there different quality tiers in Arduino starter kits?
Yes, there can be variations in quality between different Arduino starter kits, particularly between official Arduino kits and those from third-party vendors. Official kits tend to have higher quality components and are more thoroughly vetted for compatibility, but may cost more. Third-party kits can be more affordable but may have less comprehensive documentation or lower quality components. Check reviews and manufacturer reputation before making a purchase.
Comparison Table: Popular Arduino Starter Kits
Choosing the right Arduino starter kit can be daunting for beginners, given the myriad options available. This section presents a comparative overview of popular starter kits, highlighting key features to aid in your selection process. The following table details these kits based on components included, example projects, price points, and target user levels, offering a clear side-by-side comparison.
| Kit Name | Primary Board | Key Components | Example Projects | Price (USD) | User Level |
|---|---|---|---|---|---|
| Official Arduino Starter Kit | Arduino Uno | Breadboard, Jumper Wires, Resistors, LEDs, Various Sensors | 15 Projects in the Guidebook | 95 | Beginner |
| Elegoo UNO Project Smart Robot Car Kit | Arduino Uno | Robot chassis, Ultrasonic sensor, Line tracking module, IR remote, Motor driver | Line following robot, Obstacle avoidance robot | 70 | Beginner to Intermediate |
| Smraza Ultimate Starter Kit | Arduino Uno | LCD, Joystick, Relay, Stepper Motor, RFID module, Various Sensors | Smart Home projects, Electronic games | 50 | Beginner to Intermediate |
| Vilros Arduino Uno 3 Ultimate Kit | Arduino Uno | Breadboard, Jumper Wires, LCD, Servo, LEDs, Various Sensors | Multiple projects with LCD display, sensors and motors | 65 | Beginner to Intermediate |
| Keyestudio Super Starter Kit | Arduino Uno | Relay, IR Receiver, LCD1602, Servo, Stepper Motor Driver, Sensor Modules | Traffic light simulation, motor control projects | 60 | Beginner to Intermediate |
Arduino starter kits are more than just boxes of electronics; they are your key to a world of innovation and hands-on learning. Armed with a basic kit and some imagination, the possibilities are endless. Whether you are tinkering with a simple LED or crafting a complex sensor network, the principles of electronics and programming you learn from your Arduino starter kit are foundational. So, take that leap, explore the world of microcontrollers, and you'll be amazed by what you can create with your own arduino starter kits. Start building now!